


From the ED glass in its objective lens to its one-piece aircraft aluminum tube, everything about the new Redfield sends a message to the competition: The sleeping giant is awake. In fact, many of Redfield’s industry-shattering features are unavailable in scopes costing hundreds more. Ask your local dealer to show you the all-new Redfield today. The most famous riflescope in history is back. And this time it’s the riflescope of the future.
Customer Service & Warranty: 800-626-3233

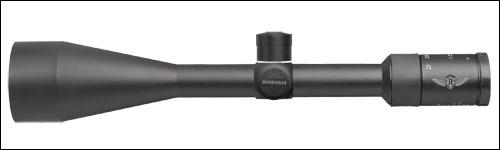
Model: 475201 5-25x52 SF
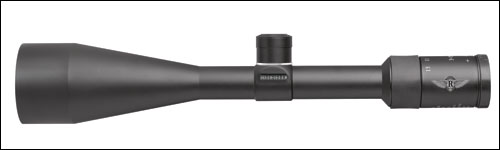
Model: 475200 3-15x52
| Model | Finish | Lens Coating | Tube Diameter | Magnification | Objective Diameter In Inches |
Field of View (Feet@100 Yards) |
Eye Relief (Inches) |
| 475201 | Black Matte | Fully Multi -Coated | 1" | 5x - 25x | 52mm | 18.8/3.8 | > 4 |
| 475200 | Black Matte | Fully Multi -Coated | 1" | 3x - 15x | 52mm | 31.5/6.3 | > 4 |
| Model | Exit Pupil (MiIlimeters) |
Length (Inches) |
Weight (Ounces) |
Click Value (MOA) |
Movement Range |
Reticle | Parallax Setting (Yards) |
| 475201 | 10/2.1 | 13.75 | 21.5 | 1/8 | 40/40 | Plex | Parallax Adjustable |
| 475200 | 13/3.5 | 13.75 | 20 | 1/4 | 60/60 | Plex | 100 |

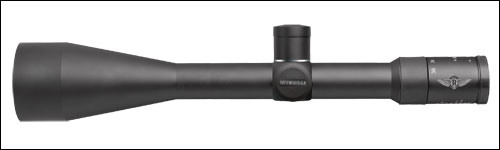
Model: 475102 6-30x56 SF
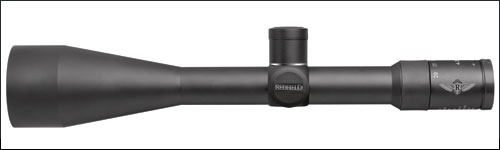
Model: 475101 4-20x56 SF
| Model | Finish | Lens Coating | Tube Diameter | Magnification | Objective Diameter In Inches |
Field of View (Feet@100 Yards) |
Eye Relief (Inches) |
| 475102 | Black Matte | Fully Multi -Coated | 30mm | 6x - 30x | 56 | 15.8/3 | > 4 |
| 475101 | Black Matte | Fully Multi -Coated | 30mm | 4x - 20x | 56 | 23.6/4.8 | > 4 |
| Model | Exit Pupil (MiIlimeters) |
Length (Inches) |
Weight (Ounces) |
Click Value (MOA) |
Movement Range |
Reticle | Parallax Setting (Yards) |
| 475102 | 9/1.9 | 15.3 | 25 | 1/8 | 60/60 | Plex | Parallax Adjustable |
| 475101 | 14/2.8 | 14.8 | 24.7 | 1/8 | 80/80 | Plex | Parallax Adjustable |
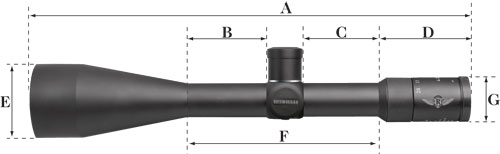
| Mounting Dimensions All measurements are in inches. |
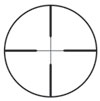 Truplex Reticle
| Model | Scope | A | B | C | D | E | F | G |
| 475201 | 5-25x52 SF | 13.75 | 2.64 | 2.80 | 3.11 | 2.42 | 6.57 | 1.57 |
| 475200 | 3-15x52 | 13.75 | 2.13 | 2.60 | 3.11 | 2.42 | 5.83 | 1.57 |
| 475101 | 4-20x56 SF | 14.80 | 2.68 | 2.60 | 3.11 | 2.58 | 6.54 | 1.57 |
| 475102 | 6-30x56 SF | 15.30 | 3.15 | 2.71 | 3.15 | 2.58 | 7.12 | 1.57 |
Attaching Mount, Rings & Scope to Your Rifle
BEFORE BEGINNING THE MOUNTING PROCEDURE, BE SURE THE ACTION IS OPEN, THE CLIP OR MAGAZINE IS REMOVED AND THE CHAMBER IS CLEAR. DO NOT ATTEMPT ANY WORK UNTIL YOUR FIREARM HAS BEEN CLEARED AND DETERMINED TO BE SAFE.
In mounting your scope, we recommend that you DO NOT take short cuts as it may lead to damage to either the mounting system or to the scope. Each mounting system will have its own instructions to follow, and it is best to read the instructions first to be sure you understand them and have the necessary tools on hand.
We further recommend that you plan to go through the mounting procedure twice. The first time, to be sure everything fits together and functions properly. On the first run through, please keep the following in mind.
1. Before attaching the base, clean the mounting holes in the receiver and the threads of the attaching screws with acetone or any good solvent to free them of oil or grease.
2. If the mount manufacturer has recommended the use of a thread adhesive, do not use it on the first mounting trial. Once the adhesive has set, it is difficult to demount if anything needs correction.
3. Be sure the mounting screws do not protrude into the receiver or the barrel.
4. When using dovetail mounts, do not use the scope as a lever when installing the scope. The initial resistance to turning may cause damage to the scope, and is not covered by the warranty. We recommend using a 1" wooden dowel or metal cylinder to seat the rings.
5. Be sure the position of the scope does not interfere with the operation of the action.
6. Be sure there is at least 1/8" of clearance between the edges of the rings and any protruding surfaces such as the turret housing (saddle), power selecting ring, and the flare of the objective bell. Also be sure there is 1/8" of clearance between the objective bell and the barrel.
7. You should test position the scope for the proper eye relief. The scope rings should be left loose enough so that the scope will slide easily. Variable power scopes should be set at the highest magnification when performing this procedure. Mount the rifle and look through the scope in your normal shooting position.
8. Test position the rifle for proper cheek weld a number of times to ensure that your scope is positioned properly.
9. When you are satisfied that everything is okay, demount and start again. This time, seat all screws firmly.
* Redfield reserves the right to modify the specifications and styling of its products without advance notice.
® The name Redfield, and the Redfield logo are trademarks registered with the United States Patent Office,
and in principal countries throughout the world.
Copyright © 2007 Redfield USA. All Rights Reserved.
This material may not be reproduced in any form without permission.